Crisis Track User's Guide:
Incident Console
Crisis TrackTM helps an organization conduct damage assessments and process FEMA grant applications to more quickly and more efficiently get recovery dollars into your community. The Crisis Track system combines Software-as-a-Service applications with mobile applications to allow you to manage various assessment teams in real time.
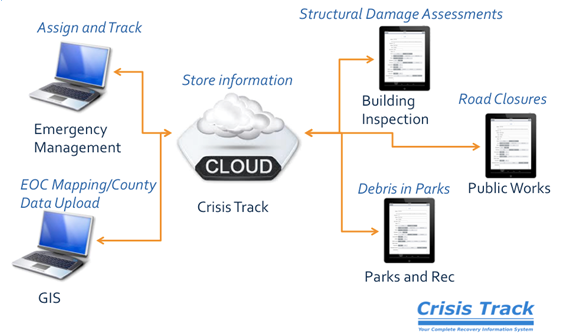
Once you've created incidents using the Adminstrative Functions module, this guide will help you manage your incidents using The Crisis Track Incident Console. If you have any questions, issues, or feedback, please contact support@crisistrack.com
Incident Console
Using the Adminstrative Functions you can set up your account and create incidents. Each incident will contain all of the details for a particular recovery effort. Once an incident has been created you can manage it using the Incident console.
Tasks
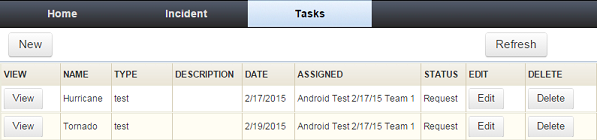
Crisis Track allows you to create tasks and assign them to teams. A Task is an activity that you assign to a team: conduct a damage assessment in a certain area, clear road closures, or complete a group of tasks.
Using the Tasks module you can create a new task and edit and delete old tasks. A new task will be assigned to a team and entries from specific forms will be associated to the task.
See Teams for more info on teams.
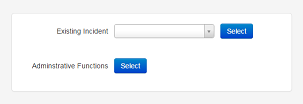
- Log into the Crisis Track Console.
- Choose an incident next to Existing Incident and click Select.
- Click the Tasks icon.

From here you can see a table of the tasks that currently exist. For each task you can view its details, edit its properties or delete the task. You can also create new tasks. You can use the Refresh button at the top right to reload this table to see any changes made since the page was opened.
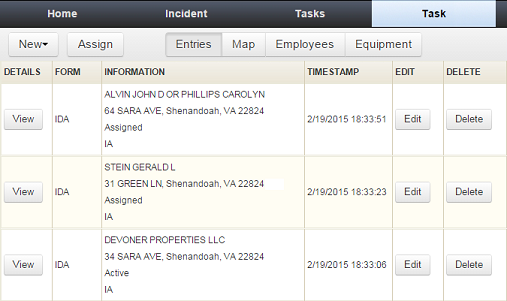
View Task
- Click View next to the task you would like to view.
- Inside of a task you can view Entries that are included as part of this task. These entries can also be viewed on a map.
- An Entry is an activity that is associated with a task, for example, a road closure or a structural assessment.
- You can create a new, blank entry by clicking the New button near the top left, then selecting the type of form that best fits the type of entry. Once a new form is created you can fill in the details as well as find the address. (See Entries for more info on creating blank entries.) Road closures are created from scratch in this way.
- To select structures for damage assessment and assign them to a task and team, click the Assign Structures button. Make sure that the structures box is selected in the left hand legend.
- Click the Select drop down to the right of Select Structures to enable Select mode. From the drop down, select Freehand Polygon.
- Once in Select mode, click and drag the mouse around the map to select structures for which you would like damage assessments conducted as part of this task.
- Once some structures have been selected (they will be circled in light blue when selected), click Assign. You know the selected structures have been assigned to the task when the yellow points change to Entry icons.
- Note: Sometimes it's easier to select a few structures and assign them, then select a few more and assign them to avoid selecting more structures than intended. Remember, you can always go back to the table and remove individual entries from the task that you mistakenly assigned.
- Both the equipment and employee timecard modules work and look exactly the same.
- You can view and edit time cards for the force labor and equipment that was assigned to this task.
- You can click on any of these bars to edit the details of or delete the time card.
- Click the New button at the top left to create a new timecard entry. First choose the equipment or employee for which you would like to create an entry. Then fill out the details of their time record.
- Change the date settings above the graph to choose what period of time the graph shows.
- Any time that the team assigned to this task did work on this task, you will see a blue bar. Overtime shows as a light blue bar.
Entries/Map


Employees/Equipment

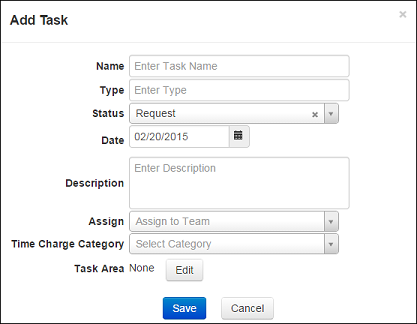
Add New Task
- Back in the list of Tasks, click Add then New Task in the top left.
- Fill in the details using the definitions below.
- Name: Name of the Task.
- Type: Optional. The type of this task using your own terminology.
- Status: "Request" initially. Other statuses are appropriate throughout the life of an incident.
- Date: Start date of the Task.
- Description: A description of the Task.
- Special Instructions: Any instructions that may be helpful for the team that completes this task.
- Assign: The team to which to assign this task.
- Time Charge Category: Choose the FEMA time charge category for the work being performed for this task.
- Limit Forms: Allows you to specify which forms will be available for this task. If this is left blank, then all forms will be available.
- Click Save.
Edit Task
- Click Edit in the row of the Task that you would like to edit.
- Much like creating a new Task, edit the Tasks's details.
- Click Save.
Delete Task
- Click Delete in the row of the Task that you would like to delete.
- Confirm this Task should be deleted. Note: This operation cannot be reversed.
Operations View
The Operations View is the view where much of the data for your incident is displayed graphically allowing you to get an overhead view of the progress of your recovery effort. There are a number of different ways to view the data. Read below for more information.
- Log into the Crisis Track Console.
- Choose an incident next to Existing Incident and click Select.
- Click the Operations View icon.

The first thing you will see in the Operations View is a map of your jurisdiction. You can display the legend, timeline and charts. You can also change the Base Map to use and adjust the refresh frequency of the map using the settings (Gear Icon). Each view can be toggled on or off. The Refresh button at the top right to reload this table to see any changes made since last refreshed. You can zoom the map in and out using a mousewheel or the "+" and "-" buttons in the top left corner of the map. A good place to start to understand the Operations View is the Legend view.
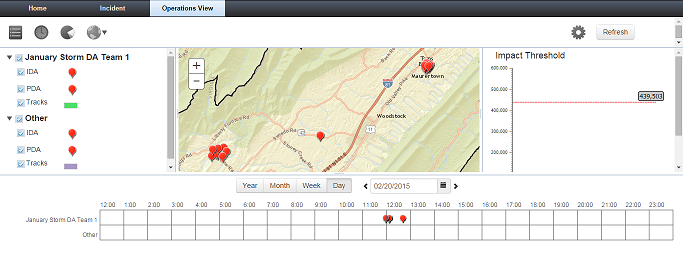
Legend
- The Legend view is the default view in the Operations View
- You can view the legend according to teams, tasks, or form types.
- Each list in the legend can be collapsed to save space by clicking the black arrow just to the left of the team, task, or form name.
- Under each team, task, or form type, you can see icons for each type of activity as well as tracks they've made while logged into their mobile app.
- Clicking a check mark next to an activity will toggle the display of that activity type on the map.
- You can also hide anything on the legend from the map by clicking the checkmark next to it.
- Hiding teams can make it easier to view specific teams activities and tracks.
Timeline
- The Timeline view shows the hours clocked by each team.
- This view allows you to get an overview of the work your teams are doing.
- Each team's data can appear or disappear from the timeline view by changing the checkmarks next to each team's name.
- You can change the timeframe that you are viewing my changing the Year/Month/Week/Day buttons near the top of the timeline view.
Charts
- The Charts view will display data pertaining to this incident in various ways. This will allow you to quantify your recovery efforts at a glance.
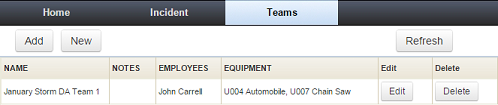
Teams
Teams are a group of personnel and equipment assigned to tasks. Using the Teams module you can add new teams and edit or delete existing teams.
Teams created here will only exist for this incident. Pre-assigned Teams created using the administrative module can also be assigned to a given task.
- Log into the Crisis Track Console.
- Choose an incident next to Existing Incident and click Select.
- Click the Teams icon

From here you can see a table of the teams that currently exist. Each team can be edited or deleted. You can also create new teams. You can use the Refresh button at the top right to reload this table to see any changes made since the page was opened.
Add New Team
- There are a few ways to add a new team to this incident.
- Click Add near the top left then click Preconfigured Team.
- To add all of the preconfigured teams as defined in the administrative module click Add next to All preconfigured teams.
- To add one at a time from the preconfigured teams as defined in the administrative module choose a team from the pull down menu and click Add next to the menu.
- Click Done.
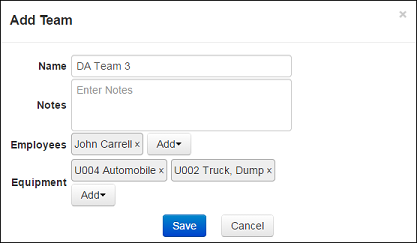
- Click New near the top left. Then click New Team.
- Enter a team name.
- Enter any necessary notes for this team.
- Using the pulldown menu next to Employees choose one employee at a time until all desired have been added. Click the "x" next to an employee to remove them from the list.
- Using the pulldown menu next to Equipment choose one piece of equipment at a time until all desired have been added. Click the "x" next to a piece of equipment to remove them from the list.
- Click Save.
Add a Preconfigured Team

Create a New Team
Edit Team
- In the table view click Edit in the row of the team that you would like to edit.
- Much like creating a new team, edit the team's details.
- Click Save.
Delete Team
- Click Delete in the row of the team that you would like to delete.
- Confirm this team should be deleted. Note: This operation cannot be reversed.
Footprint
The Footprint option allows users to create and manage Areas of Concern and Resource Locations. Customers with the All Hazards Emergency Management product will also be able to create and manage Resource Locations as part of the Footprint feature.
- Log into the Crisis Track Console.
- Choose an incident next to Existing Incident and click Select.
- Click the Footprints icon.

Area of Concern
You can add an Area of Concern both manually and by uploading a shapefile. To manually add a footprint, click Add in the top left corner. Then select Area of Concern.

When the panel on the left hand side appears, enter a name for the Area of Concern and add a description. Click Draw and select Freehand Polygon, Polygon, or Rectangle. Then draw your Area of Concern. You can change the color by clicking on the box to the right of Color.

Use AOC to Add Preconfigured Tasks
- Click back into your incident
- Select the Tasks icon
- Click Add then Preconfigured Tasks
- Expand your list of Areas of Concern and click Select to the right of the Area of Concern for your incident. This selects all of the preconfigured tasks that intersect with the Area of Concern.
- For the selected preconfigured tasks, assign the tasks to a team. If necessary, change the form to be used for the task.
- Click Add in the top left to add the preconfigured tasks to the incident.

Resource Location
All Hazard Emergency Management customers may also monitor important resources using the footprints feature.
- Click on the footprints icon within your incident
- Click Add then Resource Location
- You can search for a structure in your jurisdiction, or select Geocode, then select the hand icon, then find where on the map you want to place your resource icon.
- Once you have selected a location, name your resource and add a description.
- Select the symbol that best fits your resource type, and edit the size, if necessary
- Click Save

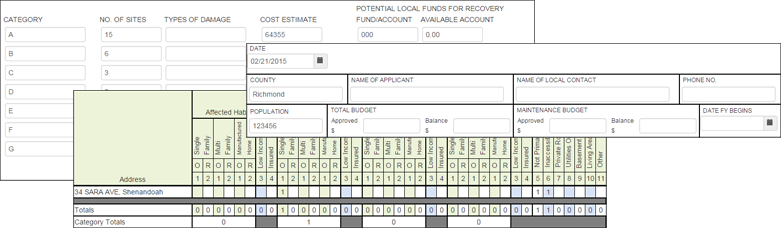
Forms
Crisis Track is capable of aggregating pertinent data and populating the typical forms to apply for community resources. Using the Documents module you can view and export your FEMA-ready forms as well as other documents.
- Log into the Crisis Track Console.
- Choose an incident next to Existing Incident and click Select.
- Click the Documents button

This will show a list of document versions that have been saved. The Documents module you can be used to view, edit, delete and export documents.
Add New Document
- Click Add in the top left.
- Select the type of document that you would like to add.
- Fill in any relevant fields.
- Click Save.
View/Edit a Document
- Click View in the row of the document that you would like to view.
- Change any fields as necessary.
- Click Save to overwrite the existing version of the document.
Delete a Document
- Click Delete in the row of the document that you would like to delete.
- Confirm this document should be deleted.
- Deleted documents can be viewed by checking the Show Deleted box.
Export a Document
- Click View in the row of the document that you would like to export.
- Click Export in the top left.
- Alternatively, all saved documents can be downloaded by clicking the Export button on the Document modules screen.
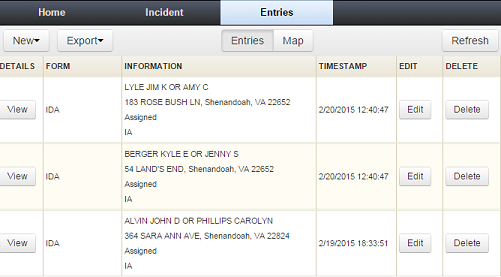
Entries
Entries are activities associated with a task, for example, a road closure or a structural assessment. When a damage assessment has been conducted or a road closure has been created it is considered an entry. Entries can be created here in the Entries Module, or inside of a particular task. Once created, they are assigned to a task so that a team can complete it. Using the Entries module you can view, create, edit and delete entries.
- Log into the Crisis Track Console.
- Choose an incident next to Existing Incident and click Select.
- Click the Entries button

From here you can see a table of the entires that already exist. Using the Entries/Map/History/QA buttons, you can switch between the table view, the map view, the history view, and the Quality Assurance view. You can use the Refresh button at the top right to reload the module to see any changes made since the page was opened.
Add New Entry
- Click the New menu near the top left.
- Choose the form you need.
- Complete the fields on the form.
- There are three ways to find the location for the structure you are assessing using the three radio buttons at the top of the Location section.
- Using the Structures method, you can begin typing into the Search for structure text box. As you type, Crisis Track will suggest actual structures already in your account. When one is selected its data is automatically filled into the form.
- Using the Geocode method you can fill the location/address in two ways:
- Type in an address into the Search for address text box. Hit Enter to search for that address. If that address is found, then the location and address fields will be populated.
- Click the Hand button. Click on the map where your damaged structure is located. If Crisis Track finds an address close to that point it will auto-populate fields on the form. If no address is found, you will receive an error message.
- Using the Manual method, you can fill in the latitude and longitude manually.
- Click Save.
Export Entries
Entries can be exported to CSV, Excel, JSON, PDF, and Shapefiles.
- Click the Export button near the top left.
- Select any filters that you would like to place on the exported data.
- Click on the button with the format of the export that you would like.
View History
The history of entry versions can be seen by clicking on the History button.
Run Quality Assurance Tests
Crisis Track can run several tests of the data including duplicate detection and checking that the damage amount is consistent with the damage category.
- Click the QA button.
- Click the Run Tests button.
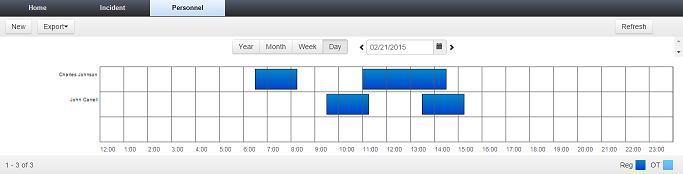
Personnel Records
Crisis Track allows you to manage the time cards of each person working on your incident. Time captured on the mobile apps for a given team can viewed here. Using the Personnel Records module you can view, edit, create and export personnel records.
- Log into the Crisis Track Console.
- Choose an incident next to Existing Incident and click Select.
- Click the Personnel Records icon.

- From here you can see a graph of personnel times across this entire incident.
- Change the date settings above the graph to choose what period of time the graph shows.
- Blue bars represent times worked by employees.
- You can click on any of these bars to edit the details of or delete the time card.
- You can use the Refresh button at the top right to reload the module to see any changes made since the page was opened.
New Personnel Record
- Click New in the top left.
- Choose the employee for whom you would like to create a time card entry by clicking Select next to their name.
- Fill in the start and end dates and times.
- The Reg/OT hours will auto-populate based on an 8 hour regular day. Only change these numbers if necessary.
- Choose the category of work the employee performed.
- The rest of the fields below will be pre-filled with the employee's normal details. Only change these numbers if necessary.
- Click Save.
Export Personnel Records
- Click the Export menu near the top left.
- Choose the file format into which you would like to export your data.
- Save the file to your system.
- Note: You will export all personnel time card data for this incident regardless of what date range you are currently viewing. If needed you can then filter or otherwise change the data it produces.
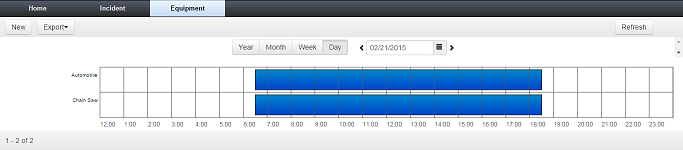
Equipment Records
Crisis Track Allows you to manage the time cards of each piece of equipment being used on your incident. Time captured on the mobile apps for a given team can viewed here. Using the Equipment Records module you can view, edit, create and export equipment records.
- Log into the Crisis Track Console.
- Choose an incident next to Existing Incident and click Select.
- Click the Equipment Records button

- From here you can see a graph of equipment times across this entire incident.
- Change the date settings above the graph to choose what period of time the graph shows.
- Blue bars represent times the equipment was in use.
- You can click on any of these bars to edit the details of or delete the time card.
- You can use the Refresh button at the top right to reload the module to see any changes made since the page was opened.
New Equipment Record
- Click New in the top left.
- Choose the piece of equipment for which you would like to create a time card entry by clicking Select next to it.
- Fill in the start and end dates and times.
- The rest of the fields below will be pre-filled with the equipment's normal details. Only change these details if necessary.
- Click Save.
Export Equipment Records
- Click the Export menu near the top left.
- Choose the file format into which you would like to export your data.
- Save the file to your system.
- Note: You will export all equipment time card data for this incident regardless of what date range you are currently viewing. If needed you can then filter or otherwise change the data it produces.