Crisis Track User's Guide:
Administration
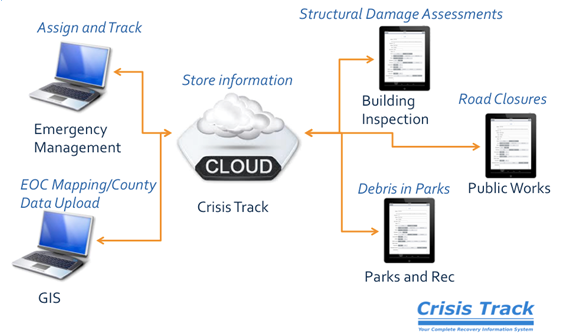
Crisis TrackTM helps an organization conduct damage assessments and process FEMA grant applications to more quickly and more efficiently get recovery dollars into your community. The Crisis Track system combines Software-as-a-Service applications with mobile applications to allow you to manage various assessment teams in real time.
This guide will help you set up your organization's Crisis Track account and walk you through using The Crisis Track Administrative Functions. If you have any questions, issues, or feedback, please contact support@crisistrack.com
Administrative Functions
If you are assigned an Administrator role for your organization, you will have access to the Administrator's console in Crisis Track upon logging into the system. The Administrator's console will allow you to set up user accounts for your organization, edit incidents, edit structures, edit equipment items, and edit your employee payroll. These data will be used by the incident console and mobile application when conducting damage assessments.
Incidents
Crisis Track allows you to track damage for several events. Using the Incidents module you can create a new incident and edit and delete old incidents. Each incident keeps data separate. Things like equipment, employees and structures are listed accross all incidents.
- Log into the Crisis Track Console.
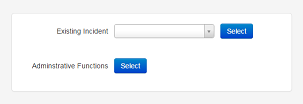
- Next to Administrative Functions click Select.
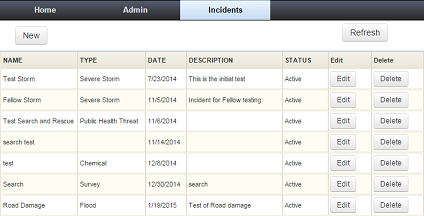
- Click the Incidents icon

From here you can see a table of the incidents that currently exist. For each incident you can edit details or delete the incident. You can also create new incidents. You can use the Refresh button at the top right to reload this table to see any changes made since the page was opened.
Add New Incident
- Click New in the top left.
- Fill in the details using the definitions below.
- Name: Name of the Incident
- Status: Active or Closed. Setting the status to Closed will remove this incident from the list of incidents that are selectable by users.
- Type: Type of Incident based on FEMA's list of types
- Date: Start date of the Incident
- Description: A description of the Incident
- Data Sharing Check Box: This check box will be shown if you have a regional view or are a part of a state Crisis Track implementation. Checking this box will allow any data in this incident to be seen in the regional view or imported into the state account.
- Enable Citizen Requests Check Box: This check box will be shown if you have a citizen self reporting website configured. Only incidents with this box checked will appear in the list of incidents on the Citizen Self Reporting website.
- Population: Population of your jurisdiction. This will be pre-filled using the population value in the Configuration module in the Administration section.
- FEMA Factor: FEMA's countywide impact indicator. The default value is the current year's value.
- Create Default Team: If this box is checked, then a Default Team will be creating in the incident.
- Create Default Task: If this box is checked, then a Default Task will be creating in the incident.
- Click Save.
Edit Incident
- Click Edit in the row of the Incident that you would like to edit.
- Edit the Incident's details as needed.
- Click Save.
Delete Incident
- Click Delete in the row of the Incident that you would like to delete.
- Confirm this Incident should be deleted. Note: This operation cannot be reversed. If you would prefer to not permanently delete the incident, but would like to remove it from the list that users can select, then edit the incident, and change the status to Closed.
Departments
Crisis Track allows you to designate departments within your jurisdiction. These could include the police department, fire department, building inspectors, etc. Employees in your jurisdiction can then be assigned to departments. Using the Departments module you can view, edit and delete departments.
- Log into the Crisis Track Console.
- Next to Administrative Functions click Select.
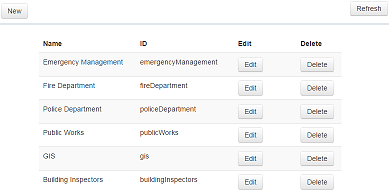
- Click the Departments button

From here you can see a table of the departments already created. You can use the Refresh button at the top right to reload the module to see any changes made since the page was opened.
Add New Department
- Click New in the top left.
- Create a Name and Department ID for the new department.
- Click Save.
Edit Department
- Click Edit in the row of the department that you would like to edit.
- Edit the department's name.
- Click Save.
Delete Department
- Click Delete in the row of the department that you would like to delete.
- Confirm this department should be deleted. Note: This operation cannot be reversed.
Structures
Your Crisis Track subscription provides you with technical support to import a GIS layer of your structure locations with tax-assessed values. The Structures module allows you to view, edit and delete the structures in your jurisdiction.
- Log into the Crisis Track Console.
- Next to Administrative Functions click Select.
- Click the Structures icon

From here you can see a table of the structures that currently exist. You can use the Refresh button at the top right to reload the module to see any changes made since the page was opened.
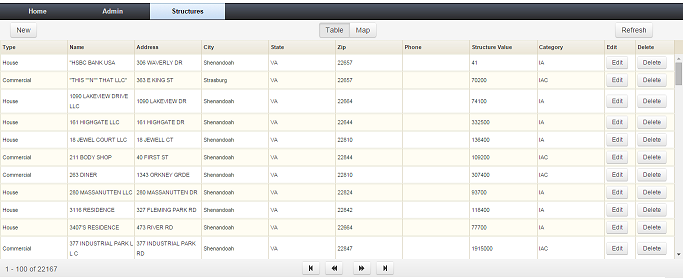
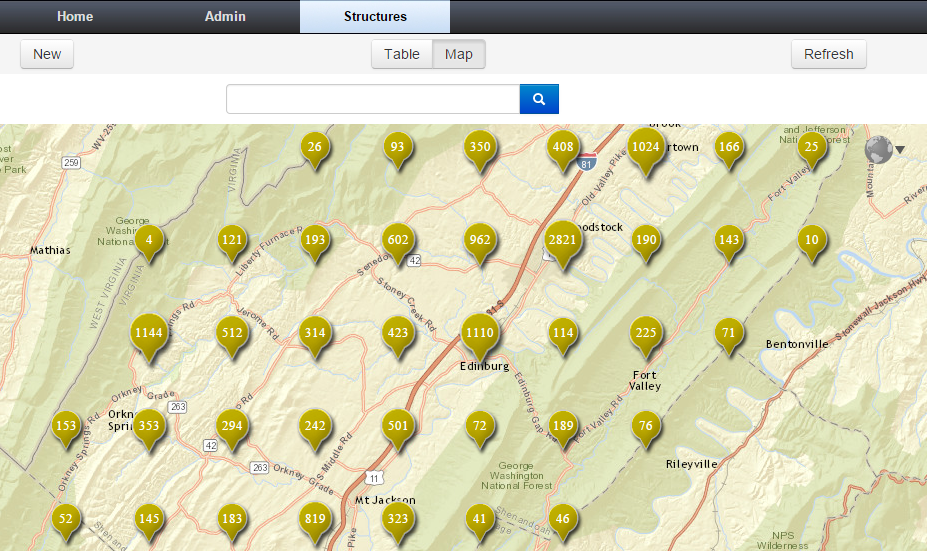
Clicking on the Map tab will show the structures on a map.
The map, for performance reasons, will group structures together and label the bubble with the number of structures in the group. Any bubble with less than 500 structures can be clicked to break it into individual structures. To break bigger bubbles you need to zoom the map in.
Note: To adjust the bubble parameters as well as other system parameters use the Settings Module.
Add New Structure
- Click New in the top left.
- Choose the default type of form that should be used for this structure.
- Choose the type of structure. For this value you can use your own local vocabulary like "Place of Worship" or "School."
- Enter the name of the owner of the structure.
- To enter the structure's address it may be easier to type the address into the Search for address box just above the map. This will correct any misspelled words and formatting and fill in the Address, City, State and Zip boxes.
- You may wish to use the hand button above the map to click a location on the map to produce an address. Click the garbage can button to resume dragging control on the map after clicking an address.
- Optional: Enter a contact number for the structure.
- Enter the improved tax-assessed value for this structure.
- Choose the FEMA category into which this structure fits.
- Note: The latitude and longitude values for your structure can be entered by hand but will be auto-populated when using the Search for address feature or click the map using the hand tool.
- Click Save.
Edit Structure
- In the table view click Edit in the row of the structure that you would like to edit.
- Much like creating a new structure, edit the structure's details.
- Click Save.
Delete Structure
- Click Delete in the row of the structure that you would like to delete.
- Confirm this structure should be deleted. Note: This operation cannot be reversed.
Equipment Inventory
Equipment with FEMA cost codes may be added manually or by bulk upload using a spreadsheet. After importing, using the Equipment Inventory module, you can view, edit and delete your equipment.
- Log into the Crisis Track Console.
- Next to Administrative Functions click Select.
- Click the Equipment Inventory button

From here you can see a table of the equipment already in your inventory. You can use the Refresh button at the top right to reload the module to see any changes made since the page was opened.

Add New Equipment
- Click Add then New in the top left.
- All values can be filled in by hand. You may wish to use the Search Cost Codes button, at the top of the form, to search through a list of current FEMA cost codes. As part of your subscription these cost codes will remain up to date when FEMA makes changes. After choosing a FEMA cost code the Equipment Name, Horse Power, Size/Capacity, FEMA Cost Code, Rate and Notes will be auto-populated.
- Enter an equipment ID number for this piece of equipment. This will fit within whatever number conventions your jurisdiction uses.
- Enter the name of the default operator for this piece of equipment.
- Enter the make of the piece of equipment.
- Enter the model of the piece of equipment.
- Choose the department to which this piece of equipment belongs.
- Click Save.
Bulk Upload Equipment
- Click Add then Upload CSV or XLS in the top left.
- Select which template you prefer - the CSV template or the XLS template. The template will download, then you can add your equipment in the template and save.
- Back in the Crisis Track console, select Select File and choose the template you just added your equipment to.
- Review your newly uploaded equipment and select Save.
Edit Equipment
- Click Edit in the row of the piece of equipment you would like to edit.
- Much like creating a new piece of equipment, edit the equipment's details.
- Click Save.
Delete Equipment
- Click Delete in the row of the piece of equipment that you would like to delete.
- Confirm this piece of equipment should be deleted. Note: This operation cannot be reversed.
Employees
Employee payroll with rates that FEMA requires may be uploaded manually or by bulk using the Crisis Track console. After importing, using the Employees module you can view, edit and delete employees.
- Log into the Crisis Track Console.
- Next to Administrative Functions click Select.
- Click the Employees icon

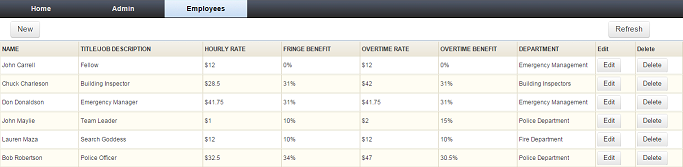
From here you can see a table of the employees already created. You can use the Refresh button at the top right to reload the module to see any changes made since the page was opened.
Add New Employee
- Click New in the top left.
- Enter the various personal details for this employee including their name, title and pay rates.
- For Fringe Benefit and OT Benefit enter the fringe benefit percentage of the corresponding rate.
- Choose the department to which this employee belongs.
- Click Save.
Bulk Upload Employees
- Click Add then Upload CSV or XLS in the top left.
- Select your preferred template - XLS or CSV. The template will download.
- Open the template and add users and their corresponding pay rates. Save the spreadsheet to your computer.
- Back in the Crisis Track console, click Select File and find the file you just saved. Open it and then click Save Employees after reviewing your newly added employees.
Edit Employee
- Click Edit in the row of the employee that you would like to edit.
- Much like creating a new employee, edit the employee's details.
- Click Save.
Delete Employee
- Click Delete in the row of the employee that you would like to delete.
- Confirm this employee should be deleted. Note: This operation cannot be reversed.
Teams
Teams consist of employees and equipment. You will assign tasks like damage assessments and road closure assessments to the teams you create. When teams log into their mobile apps all employees and equipment on that team are automatically "clocked in." Teams can consists of employees from multiple departments.
Creating teams here, in the administrative module, will create Preconfigured Teams, which can be used for multiple incidents. Inside of a particular incident a team can be created ad hoc or you can choose from any or all of these preconfigured teams to use. It can be helpful to keep track of common team configurations that will not likely suffer personnel fluctuations. These can then be quickly and easily added to a new incident and assigned tasks.
Using the Teams module you can view, edit and delete teams.
- Log into the Crisis Track Console.
- Next to Administrative Functions click Select.
- Click the Teams button

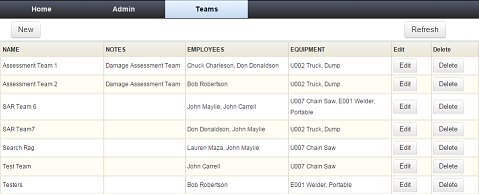
From here you can see a table of the teams already created. You can use the Refresh button at the top right to reload the module to see any changes made since the page was opened.
Add New Team
- Click New in the top left.
- Create a Name for the new team.
- Describe the nature of the team using the notes section. The notes could speak to the task they will be completing or a territory, etc.
- Add all of the employees that should be assigned to this team.
- Add all of the equipment that should be assigned to this team.
- Click Save.
Edit Team
- Click Edit in the row of the team that you would like to edit.
- Much like creating a new team, edit the team's details.
- Click Save.
Delete Team
- Click Delete in the row of the team that you would like to delete.
- Confirm this team should be deleted. Note: This operation cannot be reversed.
Users
The account information we provided you is an Administrator Account for your organization. Using the Users module you can configure users for access to your organization's account.
- Log into the Crisis Track Console.
- Next to Administrative Functions click Select.
- Click the Users button

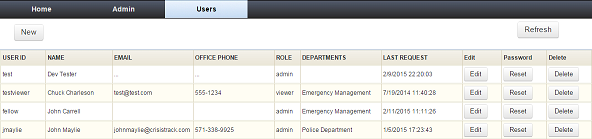
From here you can see a table of the users that currently exist. For each user you can edit their details, delete their profile or reset their password. You can also create new users. You can use the Refresh button at the top right to reload this table to see any changes made since the page was opened.
Add New User
- Click New in the top left.
- Fill in the details such as user id, name and initial password for this user. An email address is required for each user, and selecting the "Send email to user with login info" box will send them an automated email with their username and password. They will be required to change their password when they first log in.
- The Admin role will grant administrative access to Crisis Track. Be sure to choose this privilege carefully.
- The Admin (No Payroll) grants administrative access without allowing the user to see employee pay information.
- The Commander role is a User Role with the ability to create incidents.
- The User role will have normal access to Crisis Track. They will not be able to edit structures, equipment, employees, users or tasks.
- The Viewer role will not be able to edit anything.
- Choose which employee this user represents. There can only be one user for each employee.
- Choose to which department this user belongs. Learn more about departments.
- Click Save.
Edit User
- Click Edit next to the user you would like to edit.
- Much like creating a new user, edit the user's details.
- Click Save.
- Note: You cannot edit a user's password here. See just below for resetting a user's password.
Reset User Password
- Click Reset in the row of the user whose password you would like to reset.
- Enter a new password twice to confirm it.
- Click Save.
- Provide this new password to your user.
Delete User
- Click Delete in the row of the user that you would like to delete.
- Confirm this user should be deleted. Note: This operation cannot be reversed.